
Create a webhook so SpeakUp notifies your system when an Issue is created or updated. This article covers creating, editing, disabling, and deleting a webhook configuration.
To understand what webhooks do and whether they suit your integration, see what are webhooks and when should I use them?
On this page: Before you start · Create a webhook · Authentication · Edit a webhook · Disable a webhook · Delete a webhook · Common problems
Before you start
- The Webhooks package must be enabled on your SpeakUp system. Contact your Customer Success Manager if you are not sure by clicking 'Support' and 'Contact support'.
- You must have the Administrator role. Webhook configuration is accessible only to administrators.
- Configure the endpoint in your target system first, and have its URL to hand.
- Know which authentication your target system requires, and have the credentials if it uses Basic Auth.
Create a webhook
- Go to "Settings" -> "System" -> "Configuration" and select the "Webhooks" tab.
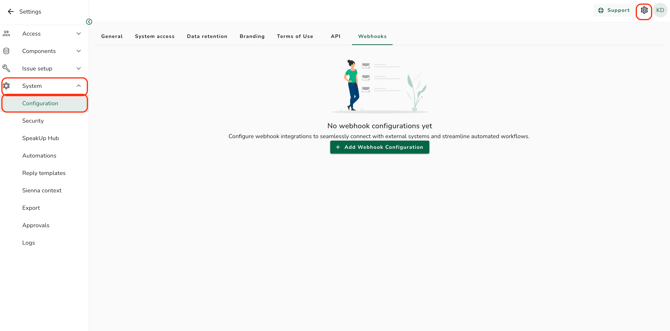
- Click "+ Add Webhook Configuration". A modal window opens.
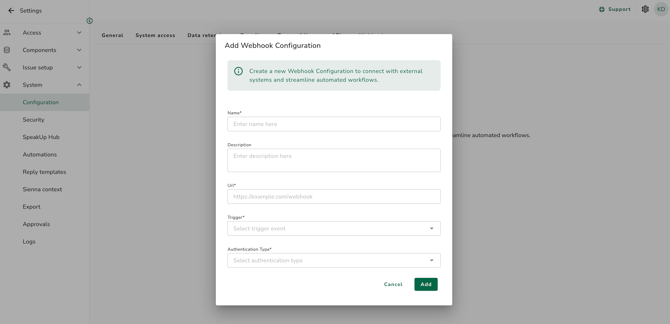
- Enter a Name. Use something descriptive, so the configuration is easy to identify later in the list.
- Enter a Description explaining the webhook's purpose.
- Enter the URL of the endpoint that will receive the payload. It must begin with
http://orhttps://. - Select the Trigger, either Issue Created or Issue Updated.
- Select the Integration Type, for example Client Managed.
- Select the Authorisation type, either No Auth or Basic Auth. See below.
- Click Add.
A webhook cannot be added until Name, URL, Trigger, Integration Type, and any required authentication credentials are all filled in.
Each webhook has one trigger. To receive both Issue Created and Issue Updated events, create two webhook configurations.
Authentication
Webhooks support two authentication options. Choose the one your target system requires.
| Option | Use it when | What you enter |
|---|---|---|
| No Auth | The target system requires no credentials. | Nothing further. |
| Basic Auth | The target system uses HTTP Basic Authentication. | The username and password required by the endpoint. |
Webhook data is transmitted over HTTPS. Bearer tokens, signed payloads, and mutual TLS are not supported.
Edit a webhook
You can change a webhook's name, description, URL, trigger, and authentication at any time.
- Go to Configuration > Webhook Configuration.
- Click the name of the webhook to open its Webhook Details page.
- Make your changes.
Two kinds of change save differently.
| Field | How it saves |
|---|---|
| Name, Description | Saved automatically. |
| URL, Trigger, Authorisation | Saved only when you click Save Changes. |
To change the authentication, open the Delivery Method & Auth section and select the new Authentication Type. If you select Basic Auth, enter the username and password, then click Update.
Disable a webhook
Disabling stops a webhook firing without removing its configuration. Use it during maintenance on the target system, and re-enable it afterwards.
- Open the Webhook Details page for the webhook.
- Switch the Status toggle next to the webhook name from Enabled to Disabled.
Events that occur while a webhook is disabled are not delivered afterwards. Failed and skipped deliveries are not retried.
Delete a webhook
Deleting a webhook permanently stops event transmissions and removes its configuration from the system.
A webhook must be disabled before it can be deleted. The delete option only becomes available once the Status toggle is set to Disabled.
- Open the Webhook Details page and set the Status toggle to Disabled.
- Click Delete Webhook Configuration.
- Click Delete in the confirmation dialog.
A confirmation message appears and you are returned to the Webhook Configuration list.
Common problems
| What you see | What it means | What to do |
|---|---|---|
| The webhook cannot be added | A mandatory field is incomplete. | Check Name, URL, Trigger, Integration Type, and the authentication credentials. |
| Deliveries stop arriving | The target endpoint is unreachable, or its URL has changed. | Confirm the endpoint is reachable from outside your network and that the URL on the details page is current. |
| Deliveries are rejected by the target system | The Basic Auth credentials are wrong, or have been rotated. | Re-enter the username and password in the Delivery Method & Auth section and click Update. |
| Some events arrive and others do not | The endpoint took longer than 10 seconds to respond. | A slow response counts as a failed delivery, and failed deliveries are not retried. |
| Only creations or only updates arrive | Each webhook has a single trigger. | Create a second webhook configuration for the other trigger. |
| The Delete option is not available | The webhook is still enabled. | Set the Status toggle to Disabled first. |
Next steps
- Webhook events and payloads for what each event reports
- Retrieving Issues to fetch the Issue after a webhook arrives