This feature might not be available in your system; please contact your Customer Success Manager for further information.
Microsoft SharePoint is a part of the Microsoft Suite cloud storage solution.
You (as an administrator of both systems) may integrate SpeakUp data with your organization’s SharePoint. In doing so, the system will automatically export SpeakUp data once a day to the specified folder in your SharePoint environment. The data is exported in a single .xlsx file, with multiple tabs.
You can use this automatically updated export file to integrate the SpeakUp data with your own business intelligence tool (for example Power BI dashboard).
-
All data is exported except the communication with the reporter.
-
Timestamp in metadata is UTC+0
Who can do this?
-
SpeakUp System administrator
-
Microsoft Suite System administrator
1. Notepad
Open Notepad, or any other note taking software. You will use this to keep track of some information.
You can copy this notepad and fill it in as you go:
Display name:Site ID:SharePoint Tenant:SharePoint Group:Application (client) ID:Secret Value:Directory (tenant) ID:Export Folder:
2. Create the App Registration (Azure Portal)
-
Go to https://portal.azure.com
-
Navigate to Microsoft Entra ID → App registrations
-
Click + New registration
-
Enter a name (e.g., SpeakUp SharePoint Integration App)
Display name
Copy and paste the App name in Notepad as the Display name
5. Choose:
-
-
Supported account types: Accounts in this organizational directory only
-
Redirect URI: leave blank or use http://localhost if needed
6. Click Register
-
3. Add Microsoft Graph Application Permission: Sites.Selected
-
In your app registration, go to API permissions → + Add a permission
-
Select:
-
Microsoft Graph
-
Application permissions
-
Search for and select: Sites.Selected
-
-
Click Add permissions
-
Back on the API permissions screen, click Grant admin consent for [Tenant]
This gives the app no access to SharePoint until you explicitly assign it to a site.
4. Get the App’s Client ID
-
Go to the app’s Overview
Application (client) ID
Copy the Application (client) ID and paste it in the Notepad
Directory (tenant) ID
Copy the Directory (tenant) ID and paste it in the Notepad
5. Ensure You Are Site Collection Admin on the Target Site
You must be a Site Collection Administrator of the SharePoint site you want the app to access.
Example site:
https://xxxxxxx.sharepoint.com/sites/yyyy
SharePoint Tenant
The xxxxxxx part can be put in Notepad as the “SharePoint Tenant“
SharePoint Group
The site (yyyy) can be put in Notepad as the “SharePoint Group“
-
Open the site in a browser
-
In the top bar, go to ⚙️ → Site permissions → Advanced permission settings
-
Make sure your user has Full Control
If not, your SharePoint admin can promote you.
6. Open Microsoft Graph Explorer
-
Go to: Microsoft Graph Explorer
-
Sign in (right top) as the Site Collection Admin from step 5
7. Consent to Graph Explorer Permissions (One-Time Only)
-
In Graph Explorer:
-
Set method to GET
-
Use this URL as base and change the values xxxxxxx with the values you used on point 5 for Sharepoint tenant; and yyyy for sharepoint group):
https://graph.microsoft.com/v1.0/sites/xxxxxxx.sharepoint.com:/sites/yyyy
-
-
Click Permissions (Modify permissions)
-
Search for and enable:
-
Sites.FullControl.All (Application or Delegated — Graph Explorer uses delegated)
-
-
Click Consent (you’ll need to do this with admin privileges)
Note: This is required only for assigning the permission.
8. Get the Site ID
-
Run the query
Site ID
Copy the value of the "id" field from the response and paste it in Notepad as the Site ID
(e.g., xxxxxxx.sharepoint.com,GUID1,GUID2)
9. Assign the App Access to the Site
-
Set method to POST
-
Use this URL:
https://graph.microsoft.com/v1.0/sites/{site-id}/permissions-
Replace {site-id} with the full ID from step 8
-
Use this Request body (replace the Application (client) ID and Display name):
{
  "roles": [ "write" ],
  "grantedToIdentities": [
    {
      "application": {
        "id": "put the Application (client) ID here",
        "displayName": "put the Display name here"
      }
    }
  ]
}
3. Click Run query
4. Check if the response was: “ Created - 201”
10. Create Secret Value
-
Go back to the Microsoft Entra ID App
-
Under Manage, find Certificates & secrets
-
Under Client Secrets, click [ + New client secret ]
-
Give it a description and set the expiration.
Expiration
After the secret is expired, you will have to set up the SharePoint integration secret again with a new secret, following this page from step 9.
Secret Value
After creation of the client secret, copy and paste to Secret Value to Notepad
11. SharePoint folder
-
Decide which folder within your SharePoint site the data exports should be uploaded to; if the folder does not yet exist, make sure to create it now
-
Example: In the site, go to Documents and create a folder named “SpeakUp Exports”.
-
Export Folder
The Export Folder starts with Documents/ and depends on the folder you chose.
For example:
Documents/SpeakUp Exports
or
Documents/SpeakUp/Automatic Exports
Write your Export Folder in Notepad
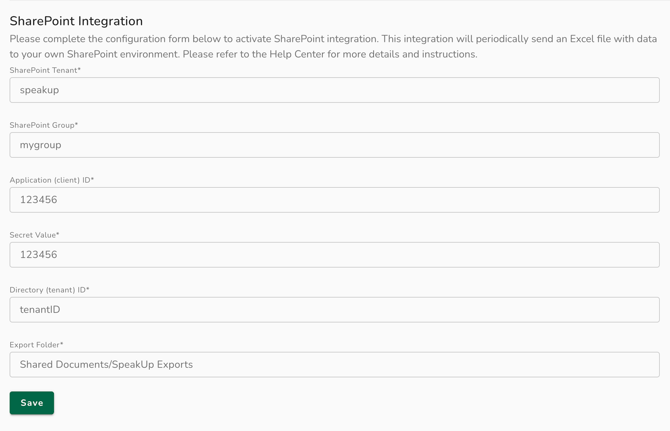
12. SpeakUp configuration
-
Open SpeakUp
-
Go to the SpeakUp Export - SharePoint Integration page and fill the following information in the textboxes:
-
SharePoint Tenant
-
SharePoint Group
-
Application (Client) ID
-
Secret Value
-
Directory (tenant) ID
-
Export Folder
-
-
Click save and wait for a confirmation
-