
Connect an identity provider that uses the OAuth 2.0 client credentials flow, so it can provision Users and Groups into SpeakUp automatically.
The SpeakUp side of this setup is the same for any identity provider that uses client credentials. The provider steps below use Microsoft Entra ID as the example. If your identity provider uses the authorisation code flow instead, for example Okta, see how do I set up SCIM using the authorisation code flow?
On this page: Before you start · Create the enterprise application · Create the App Integration in SpeakUp · Configure provisioning · Test the connection · Assign Users and Groups · Start provisioning · Verify · Common problems
Before you start
- SCIM provisioning must be enabled for your organisation. Contact your Customer Success Manager if you are not sure by clicking 'Support' and 'Contact support'.
- You need the Administrator role in SpeakUp.
- You need permission to create enterprise applications in your identity provider.
For what SCIM does and does not sync, see what is SCIM provisioning and when should I use it?
Create the enterprise application
In Microsoft Entra ID:
- Sign in to the Azure Portal.
- Go to Azure Active Directory > Enterprise applications.
- Click + New application.
- Click + Create your own application.
- Enter a name, for example SpeakUp SCIM Provisioning.
- Select Integrate any other application you don't find in the gallery (Non-gallery).
- Click Create.
Create the App Integration in SpeakUp
Your identity provider needs credentials from SpeakUp before it can connect.
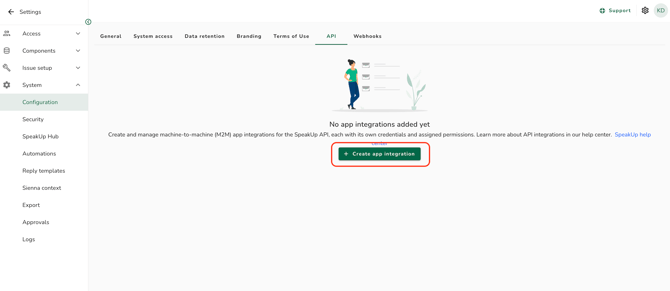
- Sign in to SpeakUp and go to Settings > System > Configuration > API.
- Click + Create app integration.
- Enter a Name, for example Entra ID SCIM Provisioning.
- Set the Authentication method to client credentials.
- Set Users and Groups access to Full access. This is required for provisioning. With read only access your identity provider can retrieve Users and Groups but cannot create or disable them.
- Click Add.
The detail page then shows three values you need next. Keep the page open.
| Value | Used for |
|---|---|
| Client ID | Identifies the integration to SpeakUp. |
| Client Secret | Authenticates the integration. Copy it exactly, with no added spaces. |
| Token Endpoint | The URL your identity provider calls to obtain a token. |
For more on App Integrations, see how do I create an App Integration and get API credentials?
Configure provisioning
Back in Entra ID, open the enterprise application you created and go to Manage > Provisioning.
- Set Provisioning Mode to Automatic.
- Set Authentication method to OAuth2 Client Credentials Grant.
- Fill in the fields below using the values from your App Integration.
| Field | What to enter |
|---|---|
| Tenant URL | Your SpeakUp SCIM endpoint, in the form {API_BASE_URL}/scim/v2. It must end with /scim/v2. |
| Client ID | The Client ID from your App Integration. |
| Token Endpoint | The Token Endpoint from your App Integration. |
| Client Secret | The Client Secret from your App Integration. Copy it exactly. |
The Tenant URL is the most common source of failure. Without the /scim/v2 suffix the connection test fails.
Test the connection
- Click Test Connection.
- If the test succeeds, a confirmation message appears. Click Save.
If the test fails, see Common problems below.
Assign Users and Groups
Only assigned Users and Groups are provisioned to SpeakUp.
- In the application, go to Users and groups.
- Click + Add user/group.
- Select the Users or Groups you want to provision.
- Click Assign.
Start with a small test group of three to five Users to validate the integration before provisioning your whole organisation.
Start provisioning
- Go back to Provisioning.
- Click Start provisioning.
The initial sync may take several minutes depending on how many Users and Groups are assigned. After that, Entra ID syncs changes every 40 minutes.
To apply a change sooner, click Pause provisioning, wait a few seconds, then click Resume provisioning. Changes appear in SpeakUp within a few minutes.
Verify
- Sign in to SpeakUp.
- Go to the Users section.
- Confirm that Users from your identity provider appear.
- Check that attributes such as email, name, and department match.
Newly created Users automatically receive a SpeakUp invitation email.
Then test an update: change a User's attribute in your identity provider and confirm it reaches SpeakUp on the next sync. Once that works, assign the rest of your Users and Groups.
Common problems
| What you see | What it means | What to do |
|---|---|---|
| Test Connection fails | Most often the Tenant URL or the Client Secret. | Confirm the Tenant URL ends with /scim/v2, and recopy the Client Secret from SpeakUp with no extra spaces. Confirm SCIM provisioning is enabled for your organisation. |
| Assigned Users do not appear in SpeakUp | Provisioning has not started, or the first sync is still running. | Check the Users are assigned to the application, that Start provisioning has been clicked, and allow five to ten minutes for the first cycle. |
| Sync stops or shows errors | Credentials may have expired, or a specific record is failing. | Open Provisioning > Logs in Entra ID and read the error. Update credentials if needed, then pause and resume provisioning. |
| A User is unexpectedly disabled in SpeakUp | Their email address or username was changed through the app assignment. | Change these in your identity provider's user directory, never through the SCIM connection. |
If a problem is not covered here, contact SpeakUp support with the exact error message from your identity provider's provisioning logs, the number of Users being provisioned, and when the issue started.